Installing the iPort Guide

Hands-On: 10-Step iPort Installation Guide
Griffin Technology, Inc. Price: $70 list
November 28, 1998
Return to the iPort hands-on review
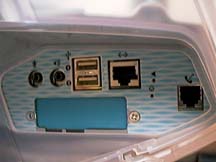
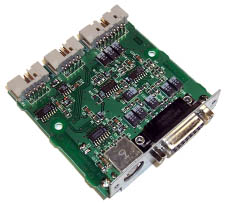 Griffin Technology recommends using an Apple Authorized Service Center to install the iPort shown at right. This is to minimize the likelihood of accidentally doing some damage to the iMac during installation that will not be covered by Apple's warranty. This is true of anything one adds to the inside any Mac, including RAM and PCI cards. Simply installing the iPort does not void your Apple warranty according to Griffin. The iPort is installed where the blue plate cover is on the iMac's port plate as shown in the photo below.
 Disclaimer: It is not very difficult to install the iPort. However, I have experience in installing virtually anything you can think of in many types of Macs. I have also installed extra RAM and extra VRAM in my iMac without drama. The iPort is no more difficult to install but a bit more complex. I did it right the first time with no detailed instructions and no photos and no damage so no one reasonably handy should have any problem doing so with this strictly informational guide. The most difficult part is fitting the motherboard tray back into the iMac case and that's relatively easy. Read over this informational guide before starting. iMac2Day has a RAM/VRAM installation guide with more details on the removal and replacement of the motherboard tray and I recommend that you read it too. Still if you have any doubts or worries, please use a service provider. I am not responsible for any problems you may have. Okay, now that I've satisfied my lawyer, here goes.
Caution: As a precaution against damage from static electricity, first wear a static guard wrist band attached to the motherboard tray when you get to it. Second, work in an area that is not on a carpet if at all possible.
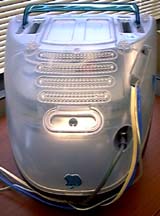 Major Step 1 is to remove the iMac's lower case cover panel. Turn the iMac over with the rear facing you. Remove the screw in the center of the handle on the lower cover. Holding the iMac below the cover, grab the cover's handle and pull the cover towards you and slightly up. It will pop off with a bit of effort. It's pretty tough but be careful. When you get it off, you might want to try replacing it to see how it goes back on. Lay the cover to one side out of the way.
Major Step 2 is to remove the motherboard tray shown below at left and now is when you should attach the wrist guard to a convenient place on a metal portion the tray. The first step is to disconnect four cables. Generally, this is easy. There are two gray ones coming around from the left and two wire harnesses from the right. One of the gray cables is pushed in and the other is screwed on. The largest harness (orange) has an indent nub on the connector that may need to be pushed in a bit to get it out. 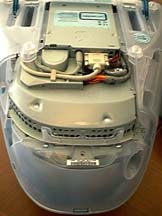 The smallest wire harness is screwed to a post and the screw must be removed. The second step is to remove the two screws that hold the tray. They are located in the clear plastic "handle" on the tray's edge nearest you when looking from the back. After removing the screws, note how the holes are positioned. You may want to mark the handle with some nail polish to ensure it goes exactly back the same way. You need to do this to make sure that the CD cover doesn't touch the edge of the iMac's front case and cause the annoying buzz from the vibration of imperfectly balanced CDs. If your iMac already buzzes, this is a chance to fix it by changing the position very slightly. Third, slide the whole tray out.
 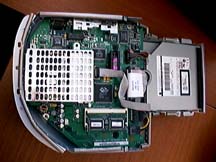 The tray includes the CD drive and its cover. Be careful and move the cables aside to allow it to slide out. Turn the tray over to expose the motherboard and set the tray where you can easily work on it.
Major Step 3 is to prepare to partially remove the motherboard. First, remove the two little screws holding the blue cover to the iMac's main port plate (shown in the second photo above). The blue plate will fall inside a bit and will be retrieved in a moment. Second, remove the two screws holding the iMac's main port plate onto the side of the tray (the top edge of the tray assembly shown at right above). The main port plate will now rotate outward from the tray and lay down so the blue plate can be retrieved. Third, disconnect the black wires cable from the front of the motherboard and the narrow gray ribbon cable in the center of the motherboard. Fourth, note the position of the black ring that gathers the CD and hard drive cables where they go under the motherboard at its front. You must have the black ring back in that position when you close up or the whole tray may not go back fully into the iMac when you finish.
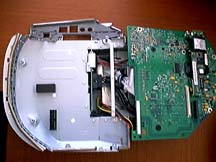 Major Step 4 is to partially remove the motherboard. First, remove the five screws holding the motherboard down around its edge. Second (this was the scariest part for me doing this for the first time), gently work the motherboard up from the rear (at left in the photo above) and free it from a long pin connector pressed into it from below at the lower right when looking from the rear of the tray. The motherboard lifts up from the rear and lays forward (to the right) exposing its underside. The long pin connector is the vertical black item in the lower left portion of the silver tray. Third, disconnect the other end of the black wires cable attached to the upper center of the auxiliary board below. Note how it is routed and remove it.
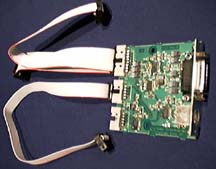 Major Step 5 is to install the iPort. There are three cables to connect in this step plus a fourth at a later step and two screws to hold the iPort onto the iMac's main port plate where the blue cover was. First, the two wider gray ribbon cables (at the top in the photo at right) are connected where the black wires cable was connected, the shorter goes to the auxiliary board in the lower tray and the longer goes to the front of the motherboard by the same route as the black wires cable. Second, the long thin gray ribbon cable that was originally attached to the top side of the motherboard needs to be rerouted under the motherboard, noting its original route, and connected to the empty connector on the
 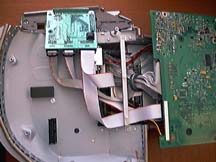 back edge of the iPort at the bottom in the photo at right. Third, the long narrow gray ribbon cable attached to the middle connector on the back edge of the iPort needs to be routed where the original long narrow gray cable was so that the new one from the iPort can be plugged into the motherboard where the original was connected. Fourth, screw the iPort to the iMac's main port plate using the two screws that held the blue plate on. The iPort's component chips will be facing down away from the motherboard and the side with the standoff will be facing up. [Note: I am reviewing a near final but preproduction unit and the photo shows a black rubber standoff. This installation results in the video connector being towards the front of the iMac and upside down and the serial connector towards the back and upside down. This may change in final production units.]
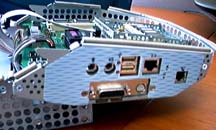 Major Step 6 is to replace the motherboard. Carefully lay it back down on the tray being sure that the iPort goes under it and that the long pin connector matches up with its connector on the underside of the motherboard. Replace the two screws on the iMac's main port side plate. Then check the motherboard's orientation with its five screw holes and the long pin connector underneath and very gently press it into place. Never force it since if it is aligned right, it goes down easily. Replace the five screws that hold the motherboard down. Connect the long thin ribbon cable from the iPort to the connector in the middle of the motherboard. Finally, check the orientation of the black ring to be sure it is exactly as it was when you started in Major Step 3. The photo above at right shows the reassembled motherboard tray with the iPort showing where the blue plate was.
Major Step 7 is to replace the motherboard tray unit into the iMac. It just slides back in but it is always a bit tricky to get it just right. Lay it upside down on the upside down iMac, noting the metal dogears in the front that go in slots in the iMac's main chassis, and push it foward being sure to carefully clear the four cables. Be certain that the tray goes all the way forward so that the CD cover is flush with the front of the iMac's case and the chassis' screw holes line up with the screw holes in the trays handle. If it doesn't, it is probably catching on one of the four cables or you forgot to properly position the black ring noted in Major Step 3. Make sure the screw holes in the chassis line up with the holes in the handle as you marked them. Replace the two tray screws. Reconnect the four cables, screwing the smaller harness to its post.
Major Step 8 is to check the installation. Reconnect the iMac's power cord. Press the start button on the front of the iMac to see if it starts and if you get an image on the monitor beyond a blank or just a gray screen. If so, you're probably home free with a good installation. Don't worry if it won't boot all the way or you get a flashing "?" or the Mac OS won't work right. My iMac didn't boot right. I'll cover what to do in step 10.
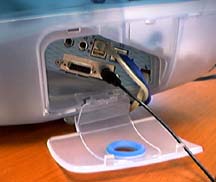 Major Step 9 is to replace the iMac's outer case lower cover. It snaps back on with a foward motion, making sure that the pins go under the flange over the CD drive area. See iMac2Day's details if you have any problems. Then replace the screw. Turn over the iMac, make sure the power cord is plugged in and reconnect the keyboard and mouse. The installed iPort with ehthernet, modem, keyboard and digital camera cable (black) connected is shown in the photo at left.
Major Step 10 is to make sure the Mac OS is working right. For some reason I had three difficulties. The first was that I got a flashing "?" on starting up. Apparently, the iMac loses its startup drive easily. The second is that I had pauses after inserting a CD into the drive. The third is that I had a very long pause (I thought it was a freeeze at first) between the clock menu appearing and the hard disk icon and other desktop icons appearing. It was as if the iMac had forgotten all of its devices and had to find them one-by-one again. All of this was fixed by resetting parameter RAM (zapping PRAM), rebuilding the desktop file and chosing the internal hard drive from the Startup Disk conrol panel. 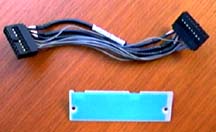 Zapping PRAM is done by holdiong down the four Command-Option-P-R keys simultaneously at the very beginning of startup until the iMac chimes four times (some say one and some say 7 times, I use 4). Rebuilding the desktop file is done by holding down the two Option-Command keys simultaneously during startup when the extension icon march begins.
That's it. You should have two left over pieces, the blue plate cover and the black wires cable shown in the photo at right. Enjoy!
Copyright © 1998 by Bill Fox
All rights reserved--no commercial use permitted without attribution.
Of course . . . . . . and I am proud to be an Evangelista! . . .
Saw something? Send a tip or a correction
The archive ran on reader tips. What did you see, where, and do you want the credit? Something wrong on this page? Say so and it gets fixed.